Maintaining your dirt bike’s carburetor is essential for keeping your bike running smoothly.
Over time, dirt and debris can build up in the carburetor, causing it to deliver a poor air-fuel mixture and reduce performance.
Luckily, rebuilding a dirt bike carburetor is not as complicated as it may seem.
I will walk you through how to rebuild a dirt bike carburetor step-by-step in plain English.
Whether you’re an experienced rider or just starting out, this guide will help you keep your dirt bike in top-notch condition for many rides to come.
Importance of regular carburetor maintenance
It’s important to keep up with regular maintenance on your dirt bike carburetor in order to avoid performance issues or even engine failure.
As previously discussed, a dirty or clogged carburetor can cause a variety of symptoms such as hard starting, poor throttle response, and plug fouling.
One time I experienced sluggish performance on my bike when going over some rollers (rounded bumps on a motocross track).
It later turned out that the carb was dirty and was trapping fuel where it shouldn’t have been.
That was totally my bad as I haven’t cleaned it in years, so joke’s on me.
By giving your carburetor a thorough cleaning or rebuilding it every year, you can keep your bike running smoothly and avoid these pesky problems.
Plus, it’s easy to access and remove the carburetor on a dirt bike, so there’s no excuse not to take care of it.
Remember, a little maintenance goes a long way in keeping your motorcycle healthy and functioning properly.
Symptoms of a dirty or clogged carburetor
Now that you understand the importance of regular carburetor maintenance, it’s also important to know the symptoms of a dirty or clogged carburetor.
Here’s what you need to look out for: if your dirt bike is having trouble starting or idling, or if it’s running rough or stalling out frequently, then it’s likely that your carburetor needs attention.
Additionally, you may notice a decrease in fuel efficiency or a strange odor coming from the exhaust.
Don’t ignore these warning signs – a dirty carburetor can cause serious damage to your bike’s engine.
In the next section, I will show you how to access and remove the carburetor so you can begin the rebuilding process.
How to rebuild the carburetor on a dirt bike
Before beginning the process of disassembling the carburetor, it is important to gather all of the necessary tools and materials. These may include:
- A carburetor cleaning kit
- Gloves
- Safety glasses
- A flathead screwdriver
- A Phillips head screwdriver
- A socket wrench set
- A container to hold parts and screws
- Carburetor cleaner
- Compressed air
Once you have all of the necessary tools and materials, you can begin the process of disassembling the carburetor.
Step 1: Remove the carburetor from the motorcycle

The first step in disassembling a dirt bike carburetor is to remove it from the motorcycle.
This will usually involve disconnecting the fuel line, throttle cable, and any other hoses or connections that are attached to the carburetor.
You may also need to remove the air filter and air box in order to gain access to the carburetor.
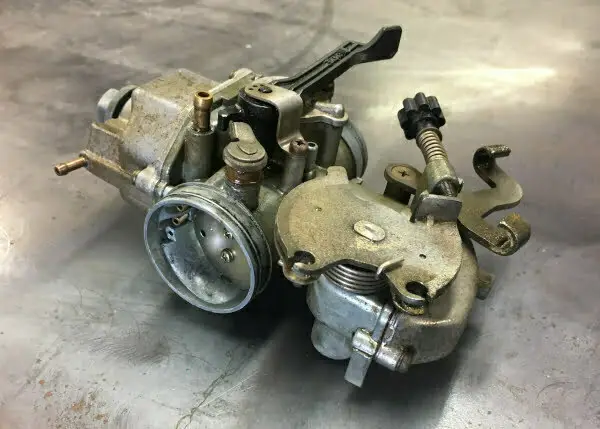
Step 2: Disassemble the carburetor
Once you have removed the carburetor from the motorcycle, you can begin to disassemble it.
This will typically involve removing the carburetor bowl, float, needle valve, main jet, pilot jet, and any other small parts that are attached to the carburetor.
As you remove each part, be sure to keep track of where it came from and place it in a container or on a clean surface to prevent it from getting lost.
Step 3: Clean the carburetor parts
After you have disassembled the carburetor, it is time to clean the individual parts.
This can be done using a carburetor cleaning kit and carburetor cleaner.
Be sure to wear gloves and safety glasses to protect yourself from the cleaning solution.
You can also use a soft-bristled brush and compressed air to remove any dirt or debris from the parts.
Pay close attention to the small passages and jets as they tend to clog easily (that’s what happened in my case when I was experiencing sluggish acceleration on my dirt bike).
Step 4: Reassemble the carburetor
Once all of the parts have been cleaned, you can begin to reassemble the carburetor.
Start by reattaching the pilot jet, main jet, and needle valve.
Then, attach the float and the carburetor bowl. Be sure to tighten all screws and connections securely, but be careful not to overtighten them, as this can damage the parts.
Step 5: Reinstall the carburetor on the dirt bike
After you have reassembled the carburetor, it is time to reinstall it on the motorcycle.
This will involve reconnecting the fuel line, throttle cable, and any other hoses or connections that were removed in Step 1.
You may also need to reinstall the air filter and air box if they were removed.
Step 6: Test the carburetor
Once the carburetor has been reinstalled, it is important to test it to ensure that it is working properly.
Start the motorcycle and let it idle for a few minutes, then rev the engine to check for any issues.
If the engine runs smoothly and responds to the throttle without any hesitation or bogging down, then the carburetor has been successfully cleaned and rebuilt.
In conclusion, cleaning and rebuilding a dirt bike carburetor can be a time-consuming process, but it is an important part of motorcycle maintenance.
If you’re not comfortable with this process, don’t hesitate to bring it to a trusted motorcycle repair shop for carburetor work. Rebuilding your carburetor will ensure that your dirt bike runs smoothly and efficiently.
Benefits of using a carburetor rebuild kit
If you’ve committed to rebuilding a carburetor on your dirt bike, using a carburetor rebuild kit comes with some major benefits.
For one, it ensures that you have all the necessary parts and components to properly repair your carburetor.
This saves you the time and hassle of tracking down individual parts separately.
Additionally, these kits typically come with OEM quality parts, meaning that you’re getting high-quality replacements for any worn or damaged parts in your carburetor.
This can help improve the overall performance and efficiency of your dirt bike.
Finally, using a rebuild kit can help you save money compared to purchasing a brand new carburetor.
Overall, using a carburetor rebuild kit is a convenient, cost-effective way to keep your dirt bike running smoothly.
When to rebuild a carburetor
Now that you’ve learned about accessing and removing the carburetor, it’s important to know when it’s time to rebuild it.
If your bike has been sitting for a while with fuel in the carb or if you’re experiencing symptoms of a dirty or clogged carburetor, it’s likely time to rebuild.
Look for seepage from the petcock outlet or external seepage as signs you need to rebuild, too.
Even if everything looks good, older motorcycles will benefit from a good carburetor cleaning before they can run properly.
Rebuilding the carb will ensure it’s functioning at its best and prevent future issues with fuel flow.
And if you’re going to rebuild, make it easy on yourself and invest in a carburetor rebuild kit, which will come complete with all the necessary parts like gaskets, needle and jets.
Common carburetor problems and solutions

Next, let’s talk about common carburetor problems and their solutions.
Symptoms like constant or excessive fuel leakage, ‘dead’ small-throttle response, and frequent plug fouling are indications of a dirty or clogged carburetor.
Lucky for you, rebuilding a carburetor is a quick and easy process that requires little more than a few basic tools and a cleaner.
However, if you’re still experiencing issues after a rebuild, your carburetor may be out of adjustment.
My dirt bike carburetor guide can help you identify and solve this problem.
Additionally, using a carburetor rebuild kit can provide benefits like saving you time and money in the long run.
Remember to also keep your carburetor clean and properly maintained to ensure optimal performance.
Finding a trusted motorcycle repair shop for carburetor work
Rebuilding a carburetor at home (well, in a garage) is not for everyone, and you may be wondering where to go if you’re not comfortable doing it yourself.
Finding a trusted motorcycle repair shop for carburetor work can be challenging, but it’s worth the effort to ensure your bike is running at its best.
Ask friends and fellow riders for recommendations, or check online reviews to find a reputable shop.
Look for a shop with experienced technicians who specialize in carburetor work and can diagnose and resolve any issues quickly and effectively.
Don’t be afraid to ask questions about their process and pricing, and make sure they use high-quality parts and offer a warranty on their work.
By finding a trusted repair shop, you’re investing in the longevity and performance of your bike.
Tips for keeping your motorcycle carburetor clean and functioning properly
Now that you have rebuilt your dirt bike carburetor (or had a mechanic do it for you), it’s essential to keep it clean and functioning properly. Here are some tips that will help you do just that.
- Make sure you have the proper size air filter and keep it clean by washing it regularly.
- Avoid using old fuel or filling up at gas stations with low-quality gasoline.
- Treat your fuel with a fuel stabilizer to prevent varnish and gum buildup in your carburetor.
- Fourthly, regularly drain your carburetor bowl to get rid of any water or debris that may have settled.
- Fifthly, check your spark plug regularly to ensure it’s clean and free of any carbon buildup.
- Lastly, it’s essential to keep your bike’s entire fuel system clean so that your carburetor is protected from potential damage.
These tips can save you time and money in the long run, allowing you to spend more time riding and enjoying your dirt bike.
Wrapping up
Congratulations on making it this far and learning how to rebuild your dirt bike carb.
Although it isn’t for everyone, with the right tools and time, rebuilding the carburetor can actually be an enjoyable task.
Be sure to invest in a good carburetor rebuild kit and maintain it properly afterwards to keep your bike running smooth. Happy trails my friend!