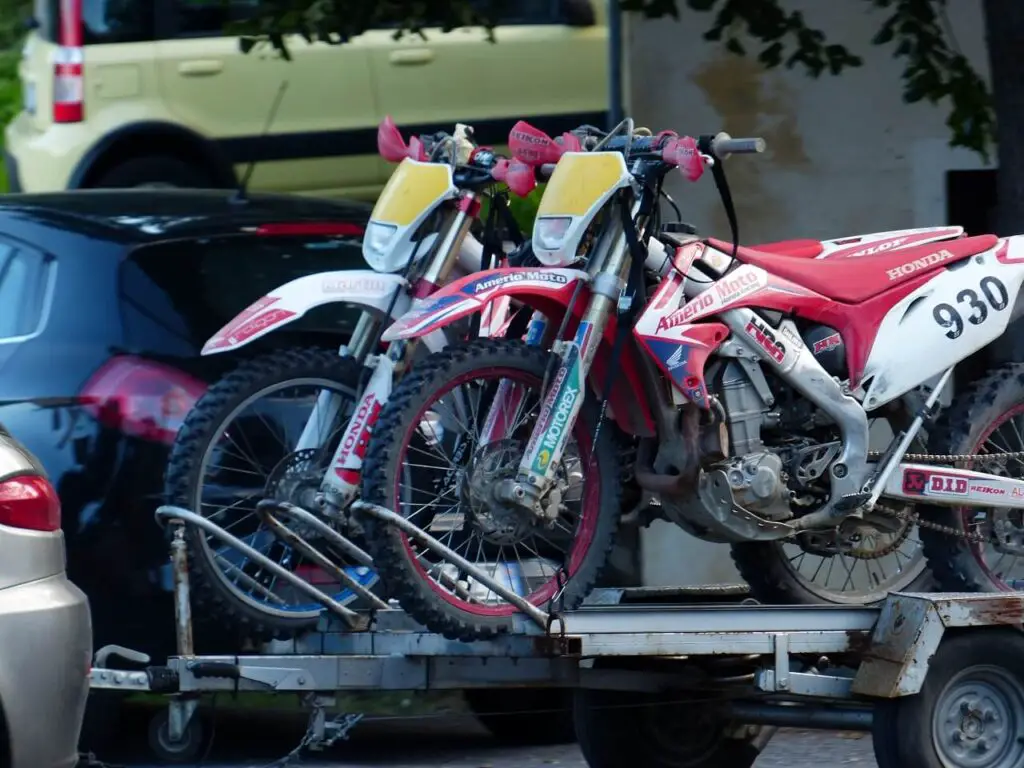
Thank the dirt bike gods for dirt bike trailers and their reliability in transporting our precious bikes to our adventure destinations.
But did you know your trusty trailer can serve more purposes than just carrying your bikes?
With some DIY dirt bike trailer ideas, you can modify your trailer and turn it into a multipurpose vehicle for your next adventure!
In this article, I’ll show you how to transform your trusty trailer to the next level and make it more than just a mode of transportation for your bike.
So, grab your notes and tools and read until the end to find your next DIY project for your dirt bike trailer.
This website uses affiliate links that may earn a commission for purchases at no extra cost to you.
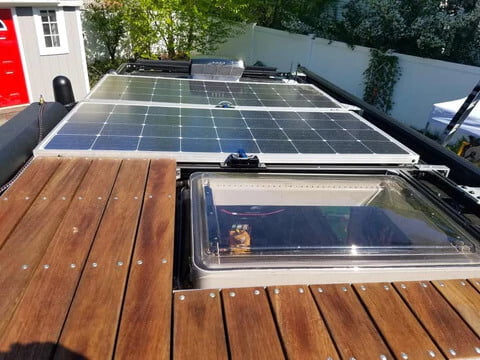
1. Solar panels
Cost: $1,500 to $3,000
I’ve installed solar panels on my dirt bike trailer before, and it’s made a difference.
Not only do I never have to worry about running out of power, but it’s also an eco-friendly solution that saves me money in the long run.
To set up solar power for your dirt bike trailer, you’ll need four essential items:
- Solar panels – dirt bike riders who use solar panels for their trailers usually install 100-watt solar panels.
- Charge controller – regulates the power flow from the solar panel to the battery
- Deep-cycle battery – stores the energy generated by the solar panel
- Inverter – converts the DC power stored in the battery to AC power so you can charge your gadgets and power small tools and appliances.
Installing solar panels on your trailer is easier than you think!
First, choose a location for the solar panel that receives the most sunlight without being obstructed by obstacles like cracks or bumps.
Then secure the panel to the trailer using brackets or bolts.
Next, connect the wires from the solar panel to the charge controller and the charge controller to the deep-cycle battery.
Finally, connect the inverter to the deep-cycle battery, and test the system to ensure everything works.
I found an excellent YouTube tutorial about installing solar panels on an RV, but you can apply the same principles method to dirt bike trailers.
Check this out if you need a step-by-step guide:
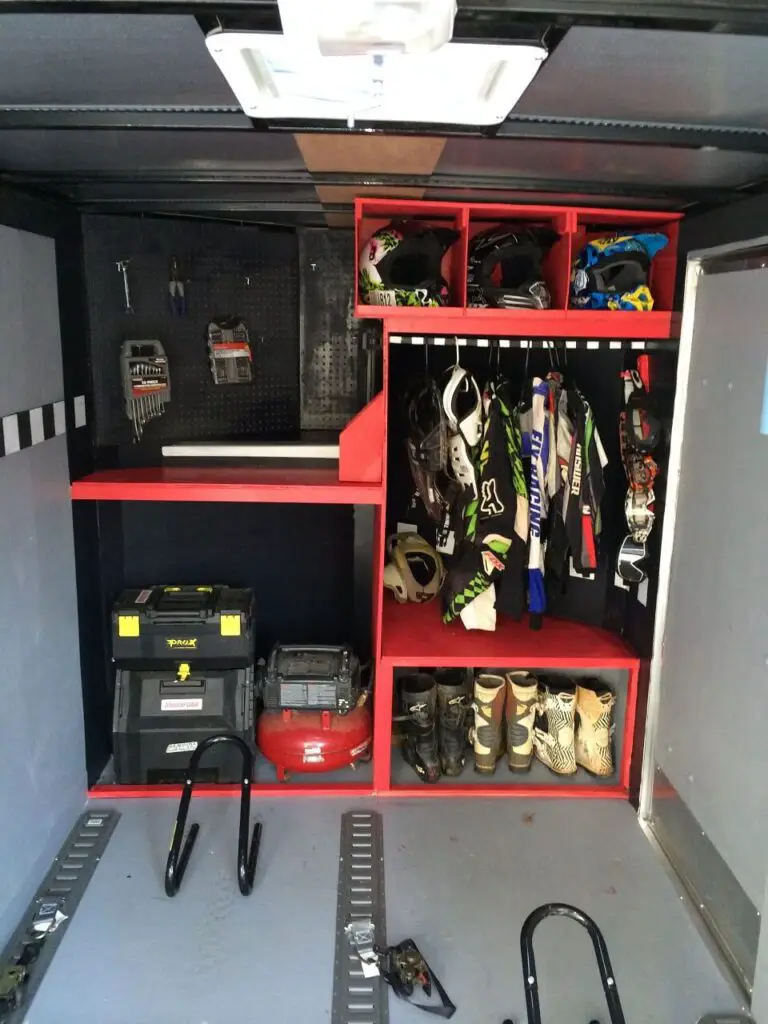
2. Customizable Storage Space
Cost: $50 to $150
If you’re like me and love taking long trips on your bike, you know how important it is to have all your gear organized and accessible.
That’s why I recommend installing storage space on your trailer.
To make your storage box for your dirt bike trailer, you’ll need:
- Plywood (or steel/aluminum if you prefer a metal cabinet)
- Screws
- Hinges
- Latch or cam locks
- Brackets
- Bolts
- Circular saw
- Drilling tools
When you’re ready to start building, first decide on the size and design of your storage box.
Cut the materials to the correct size and shape, and then assemble everything with screws or bolts. Make sure it’s sturdy and secure.
Next, add hinges to attach the lid to the box. You can also add latches or locks for extra security.
Sand and finish the box to make it look nice, and protect it from the elements with paint or stain.
Finally, install the storage box on your dirt bike trailer using brackets or other mounting hardware. That’s it!
3. LED Lighting
Cost: $50 to $500
If you love riding your dirt bike at night, installing LED lights on your trailer is an excellent idea.
It’ll give you enough lighting without too much energy, primarily if you rely on solar power and want to save energy for your gadgets and equipment.
To install LED lights on your dirt bike trailer, you’ll need a few things to get started:
- LED lights
- Power source (can be a separate battery or from your solar panel system)
- Wiring, connectors, and switches
- Wire strippers
- Pliers
- Small brackets or zip ties
- Heat shrink tubing – for connecting wires to your power source
When you’re ready to install the lights, plan where to place them and how you want to wire them.
I recommend using a wiring diagram to keep track of everything.
Clean the surface where you’ll stick your LED light strips.
Install the lights by peeling off the adhesive backing and sticking them onto your desired spots.
Next, connect the wires by soldering them to your LED lights’ positive and negative terminals.
Connect them to your power source using connectors. Be sure to test your connections before sealing them with heat shrink tubing.
Finally, turn on your lights, adjust the brightness and color, and secure the wires neatly with zip ties or clips.
Here’s a quick tutorial on how to install LED lights in an enclosed trailer:
4. Rooftop for open trailers
Cost: $100 – $500
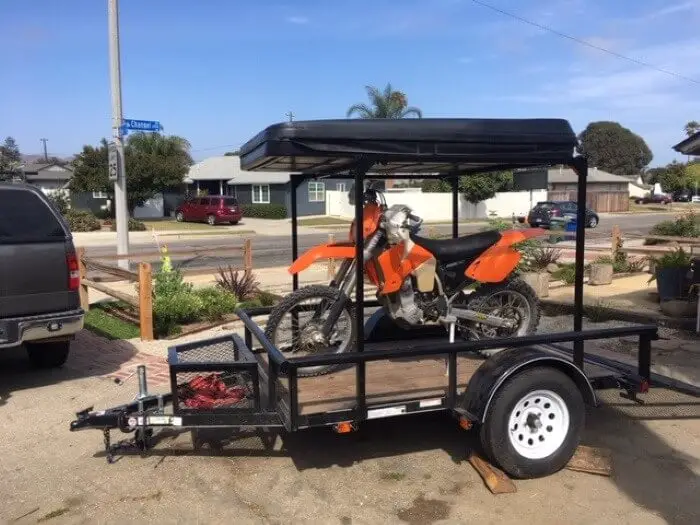
If you have an open dirt bike trailer, you know how challenging it can be to transport your bike in harsh weather conditions.
That’s why this next DIY dirt bike trailer idea is for you: a DIY rooftop.
If you’re interested in trying this idea, here’s what you’ll need:
- Roofing materials – can be corrugated metal, fiberglass panels, or canvas
- Frame materials – common frame materials include wood, metal, and PVC pipe
- Tools – saw, drill, screws, tape measure
- Brackets and hinges
- Gloves and safety glasses
Once you’ve got your materials, it’s time to build. Measure your trailer and build a frame out of PVC pipes.
Make sure the frame fits snugly on your trailer and is securely attached.
Install your roofing material.
If you’re using fiberglass, cut it to size, apply adhesive, lay it evenly on the frame, and secure it with a roller.
Lastly, add any finishing touches you like, such as tie-down points or LED lights.
5. Foldable bunk beds
Cost: $200 – $500
If you’re planning to take your dirt bike on a long-distance ride but prefer to avoid setting up a tent or sleeping bag every time you need to rest, foldable bunk beds are the solution for you!
The most convenient thing about them is that they’re foldable, so you can easily store them away and free up some space in your trailer.
To build your foldable bunk bed, you’ll need:
- Plywood / Metal mesh for the bed platform
- Metal tubing or angle iron for bed frame
- Sturdy wooden planks
- Screws
- Hinges
- Brackets
For bedding:
- Foam mattresses
- Blankets
- Pillows
Tools:
- Saw
- Drill and bolts
- Screwdriver
- Welding machine
Once you have all your materials, measure your trailer to determine the length and width of the beds.
Then, cut your frame materials like plywood and metal tubing to the desired size for the bed platform and frame.
If you don’t want to build a bed frame from scratch, you can buy pre-made frames or bunk bed supports.
Next, build the frame using metal tubing or angle iron and screw the sturdy wooden planks onto the frame to support the bed.
Attach the bed platform to the frame using hinges and ensure they’re sturdy and secure.
Finally, add brackets to hold everything in place and add bedding to complete the setup.
Check out how this camper built a bunk bed for their cargo trailer to get ideas for your bunk bed project:
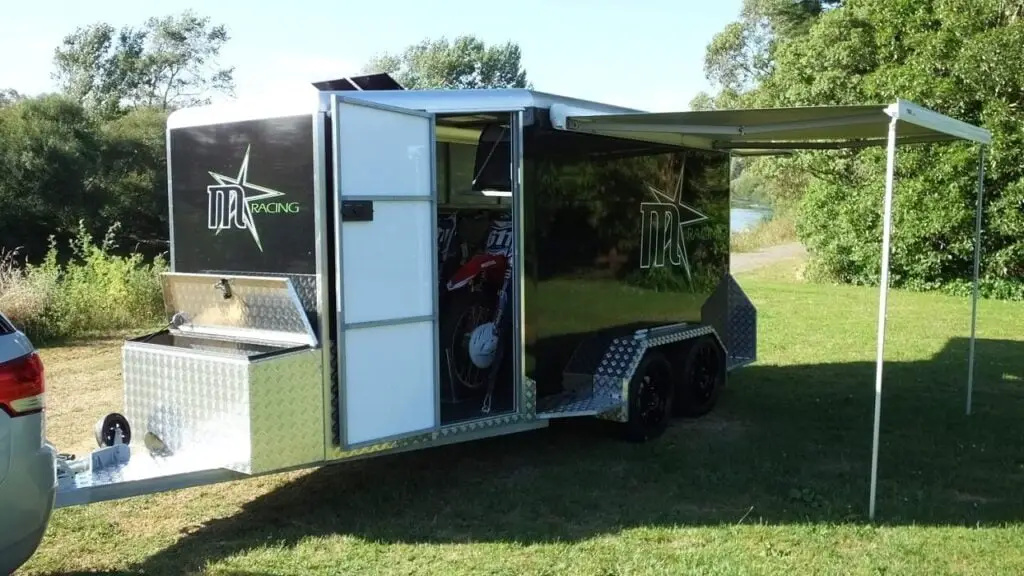
6. Camper awning
Cost: around $1500
Have you ever been on a trail ride with your dirt bike and thought, “Man, this would be the right spot to sit back and relax if only I had some shade from the blazing sun?” If you have, you’ll love having an awning on your trailer.
Adding a camper awning to your dirt bike trailer is like having your outdoor space to relax, cook, and take a break from your rides with your buddies.
It’s suitable for riders who enjoy camping and want more protection from the elements.
If you’re interested in installing a camper awning on your dirt bike trailer, here are the essential materials and tools you’ll need to get started:
Materials:
- Camper awning kit – this should come with all the necessary hardware, such as brackets and screws
- Awning fabric
- Awning rail or track – to attach the canopy to your trailer
- Seam sealer – to prevent water from seeping through the seams
- Thread
Tools:
- Scissors
- Measuring tape
- Drill and drill bits
- Socket wrench set
- Pliers
- Screwdrivers (Phillips and flathead)
- Level
- Caulking gun
Once you have all your materials and tools, it’s time to start.
Measure and mark where you want to install the awning on your dirt bike trailer, ensuring it’s level and straight.
Then, attach the brackets to your trailer using the screws provided in the awning kit.
Next, install the awning rail or track onto your trailer using screws and sealant, and slide the awning fabric into the rail.
Measure the material according to your trailer size and cut it accordingly.
Remember to leave some extra fabric for folding on the frame, curves, or corners.
Seal the seams of the awning fabric with a seam sealer to prevent water from seeping through.
Attach the awning to the brackets using the hardware provided in the awning kit.
Finally, adjust the awning’s tension using the included tensioning mechanisms until it’s taut and wrinkle-free.
7. Windows
Cost: around $200
If you want to let some natural light or fresh air into your dirt bike trailer, installing windows might be just what you need.
Windows can also be helpful in extreme temperatures.
In colder weather, the sun can heat the interior through the windows, which is useful when you want to warm up.
And in hot weather, you can open the windows to let in a breeze and cool off.
They can also make your trailer feel more spacious and less cramped.
If you’re interested in installing windows on your dirt bike trailer, here’s what you’ll need:
- Windows – I think RV windows are best for this DIY project
- Butyl tape – This will seal the window frame to the trailer and prevent water from getting in
- Screws
Tools:
- Measuring tape
- Utility knife – for cutting the butyl tape and trimming any excess material
- Screwdriver
- Drill and drill bits
To start, measure the space where you want your window to be and create a sturdy frame using wooden beams.
Use a saw to cut out the beams in the middle of the frame to create an opening for your window.
Cutting the hole in the trailer can be tricky, so I recommend watching this tutorial video for guidance:
Next, line up your windows where you’ll place them on the trailer, then drill holes in the window and on the trailer wall where you’ll put the screws later.
Apply a layer of butyl tape around the edge of your window frame.
Carefully line up the window with the hole in the trailer and press it into place.
Once the window is in place, drill in the screws to hold it securely.
8. Ventilation system
Cost: around $350
A dirt bike trail could also double as a resting place for when you need to take a break from your rides.
But sometimes, it can feel like a hotbox in there, especially during summer.
That’s why other riders opt to install a vent fan in their trailers.
Aside from regulating temperature, they also help reduce moisture buildup, which can prevent mold and mildew from invading your space.
To install a vent fan in your trailer, you’ll need:
- Vent fan – make sure to choose a fan that’s appropriate for the size of your dirt bike trailer
- Butyl tape
- Screws
- Power source like your battery from your solar panel system
- Wire connectors
Tools:
- Screwdriver
- Wire cutter
- Drill
- Jigsaw or reciprocating saw
- Measuring tape
- Safety goggles and gloves
Once you have the materials and tools, here’s how you can install a vent fan in your dirt bike trailer:
- Plan where you want to place the fan and take note of any obstacles that may get in the way of airflow.
- Measure the inside of your trailer to find the best spot for the fan.
- Measure the spot on the roof from the outside and mark where you’ll cut the hole for the fan.
- Cut the hole in the roof.
- Place butyl tape around the edges of the fan frame to prevent water from seeping through.
- Put the fan frame in the hole and secure it in place with screws.
- Connect the fan wiring to a power source and test it out.
9. Skylight
Cost: $200 – $800
If you’re spending a lot of time on the road with your dirt bike trailer, adding a skylight is an excellent way to bring in some natural light and fresh air.
Plus, it can save power by constantly turning on the lights!
To get started on this DIY project, you’ll need:
Materials:
- Skylight kit (includes skylight, hardware, and sealant; this RV skylight by ICON is a good option – opens link to Amazon)
- Butyl tape
- Silicone sealant
- Screws
Tools:
- Drill
- Jigsaw
- Screwdriver
- Measuring tape
- Marker
- Safety glasses
- Caulk gun
To install a skylight on your trailer, follow these steps:
- Measure the size of the skylight on your roof and mark it with a marker.
- Use a jigsaw to cut out the opening.
- Apply butyl tape around the hole edges before placing the skylight on top. Make sure it’s centered and flush with the roof.
- Use screws to attach the skylight to the roof.
- Apply silicone sealant around the edges to seal it and prevent water leakage. If you want more insulation, do it now.
- Test your skylight to make sure it’s secure and functioning correctly.
10. Rear stabilizer jacks
Cost: $150 – $300
Have you ever loaded up your trailer with dirt bikes and found it top-heavy and unstable?
That’s because the weight of the bikes can make your trailer shaky, especially on uneven terrain.
But I’ve seen a solution – rear stabilizer jacks!
If you’re interested in installing rear stabilizer jacks on your dirt bike trailer, you’ll need:
- Rear stabilizer jacks kit – includes the jacks themselves, brackets, bolts, and nuts
- Drill and drill bits
- Wrenches and pliers
- Socket set
- Measuring tape
- Level
- Safety glasses and gloves
Installing rear stabilizer jacks on your dirt bike trailer is simple and easy. Here’s how:
- Decide where to install your rear stabilizer jacks. Usually, they are at the back corners of the trailer frame.
- Drill a small hole where you want to install the rear stabilizer jacks in each corner.
- Position the rear stabilizer jacks over the pilot holes and insert the screws through the jack holes and into the pilot holes.
- Tighten the screws with a wrench or socket set.
- Test the rear stabilizer jacks by lowering them until they touch the ground. Put some pressure on the trailer to ensure it doesn’t move.
If you want to see the process of installing rear stabilizer jacks, check out this camper trailer built by Southern Ginger Workshop:
Conclusion
I hope you found these DIY dirt bike trailer ideas helpful and that you’re feeling inspired to try them out for yourself.
These ideas can be handy for different types of situations – from making your trailer extra secure to making it camper-friendly.
There’s no one-size-fits-all solution when it comes to modifying your trailer, so don’t be afraid to get creative and customize these ideas to your specific needs!